This tutorial will explain the process of creating a Cydia repository
from start to finish. We will cover everything from the initial
preparation all the way to the hosting and publishing of your Cydia
repository. This tutorial will get moderately technical and is not
recommended for users who are new to computers or new to the whole
jailbreaking scene. I will provide support for this tutorial through the
comments section, but you can also contact me directly at:
jaden@ijailbreak.com
What is a Cydia Repository?
Well if you are following this tutorial I would like to hope that you have some knowledge of what a Cydia repository is, but if you do not then here is a quick summery. A Cydia repository for short is just a Debian APT repository, and this meaning that anything you can install (ie through Cydia) is considered to be a package. These so called packages exist in the form of .deb files, which have a rather interesting internal format. At a high level, a .deb contains the files that are going to be installed on your ipodtouch/iphone, which is a part of the package and also “control” information which comprises of metadata about the package (its name, size, and other details). The construction of such a file is done by using a tool called dpkg-deb. Users of Debian (or Fink on a Macintosh, which is also based on APT) will already have this package installed, but users of almost any other platform are able to install it easily.
Table of Contents
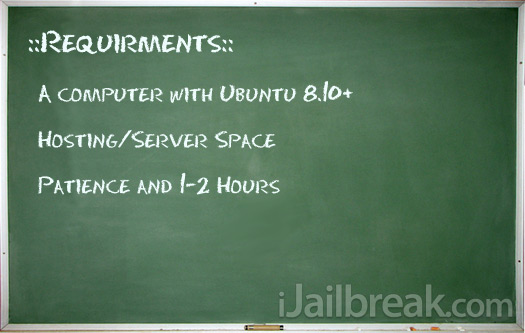
2) A Computer with Linux/Ubuntu 8.10 plus - If you are running either windows or Mac there are many ways to run Ubuntu without disturbing your current operating system. In this tutorial I will show you how to set up a virtual machine running Ubuntu that will run on both Windows and Mac OSX operating systems. There is also the option of dual booting your computer to run Ubuntu however I will not be going into detail on this subject. **Note fink on Macintosh will work, but because I don’t have a mac to test it on I can not guarantee anything… You can DOWNLOAD UBUNTU HERE.
3) Patience and an hour or two – Creating a Cydia repository (especially if your new to this sort of thing), can be very challenging and time consuming. Don’t give up if you are getting frustrated, if at any point during this tutorial you need help please post any questions/comments in the comments section below.
http://www.saurik.com/id/7
Step 1) The first thing we need to do before we can create your Cydia repository is to install and setup a virtual machine that will run Ubuntu. A virtual machine runs like an application on your current operating system but emulates the operating system of your choice (in this case Ubuntu) through a virtual hardrive. Go to VirtualBox.com and click on the download that corresponds to your operating system that you are running right now. Wait for VirtualBox to fully download before continuing to the next step…
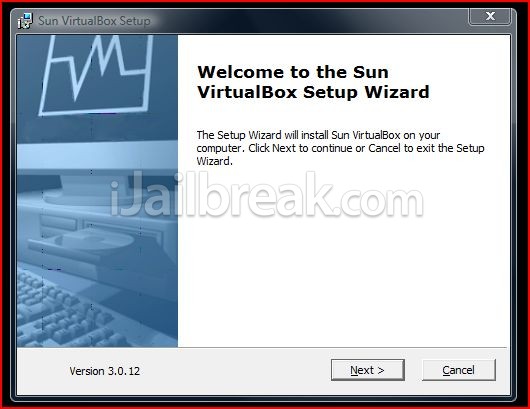
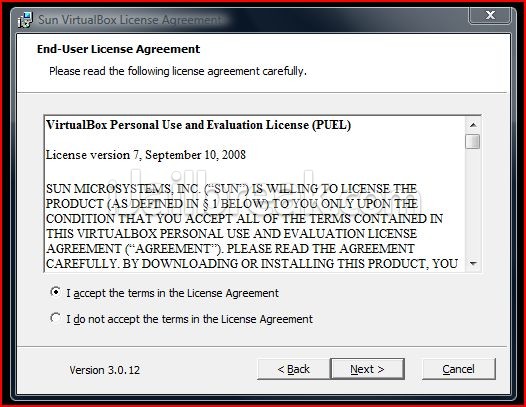
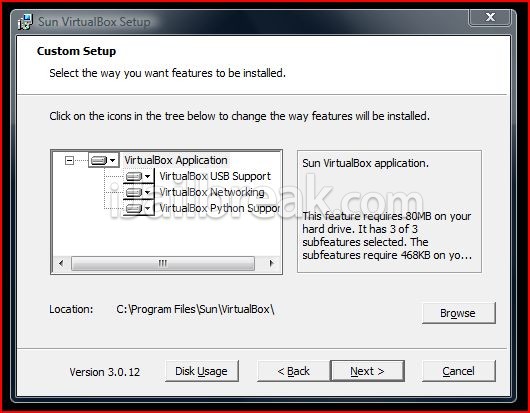
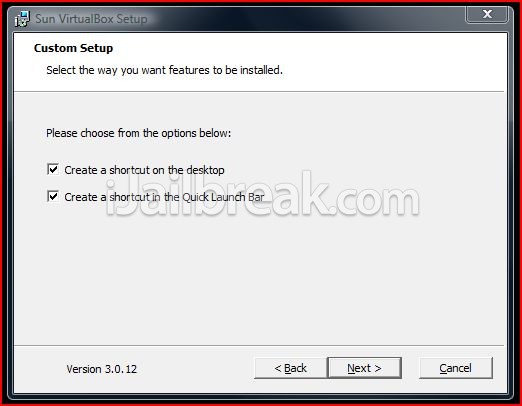
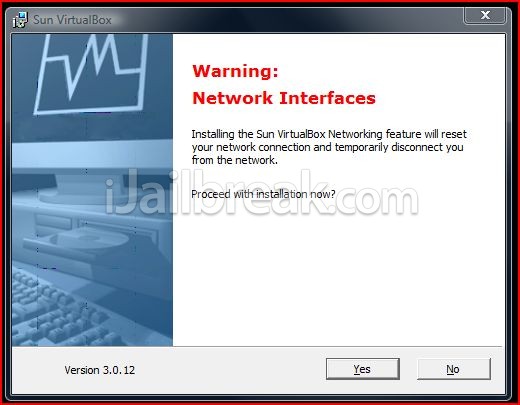
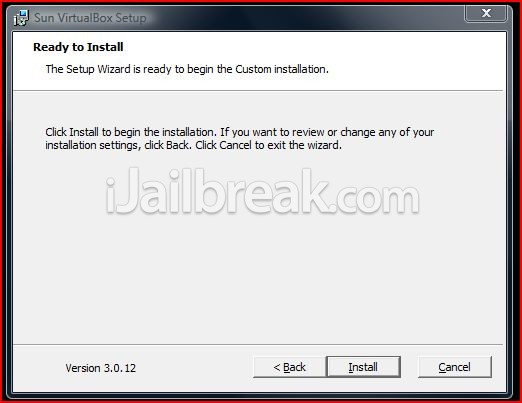
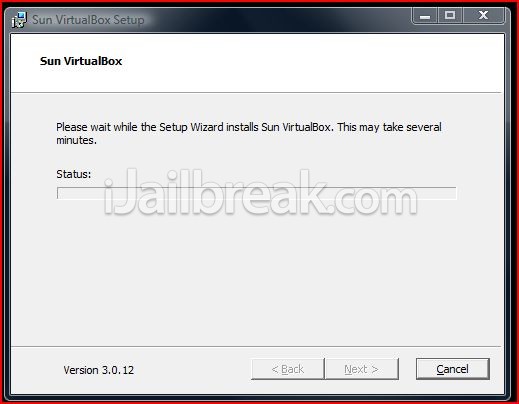
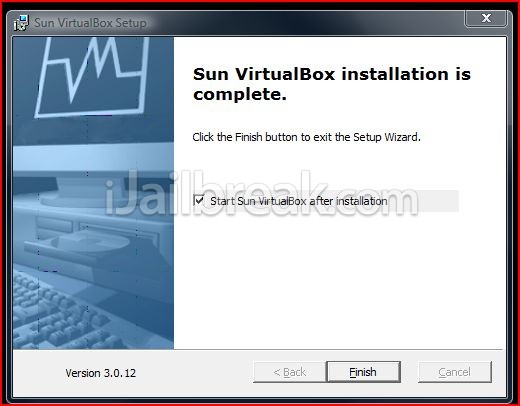
Step 2) With virtual Box now downloadew, we are going to double click on the Setup.exe to begin the installation process. Follow the Screenshots and Instructions presented to you below…
(If you know how to install VirtualBox Click Here to skip these screenshots)
Step 3) - With VirtualBox now installed we are going to need to download a copy of Ubuntu. Go to www.ubuntu.com and download the latest version of Ubuntu to your computer.
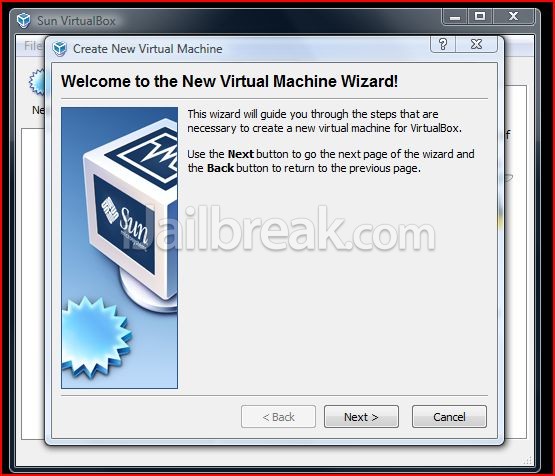
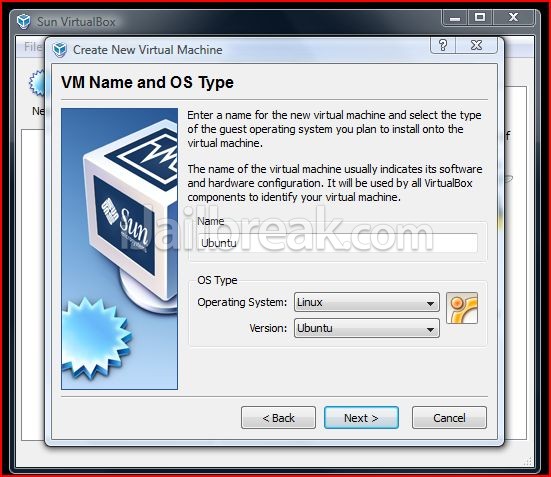
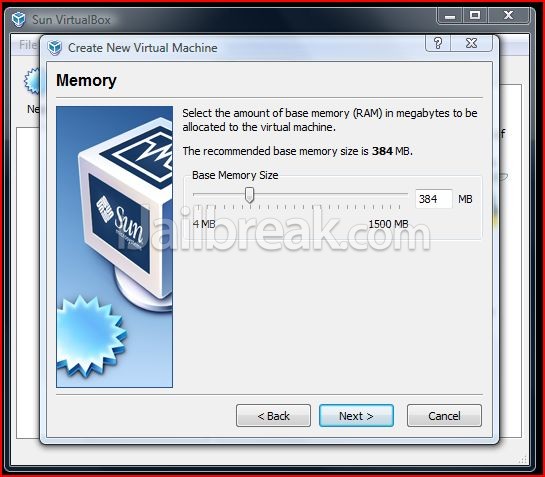
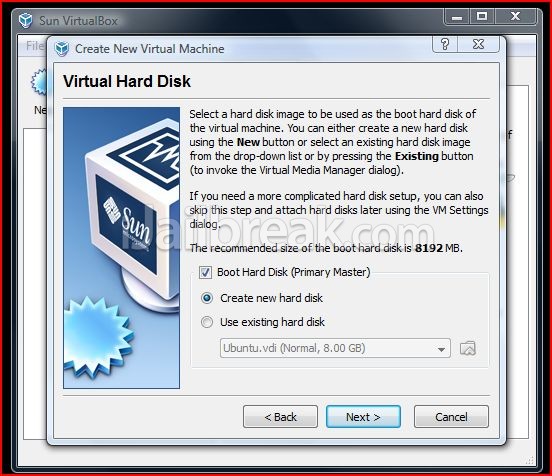
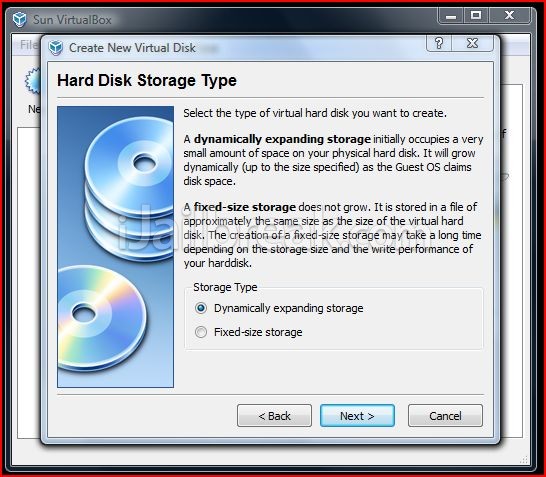
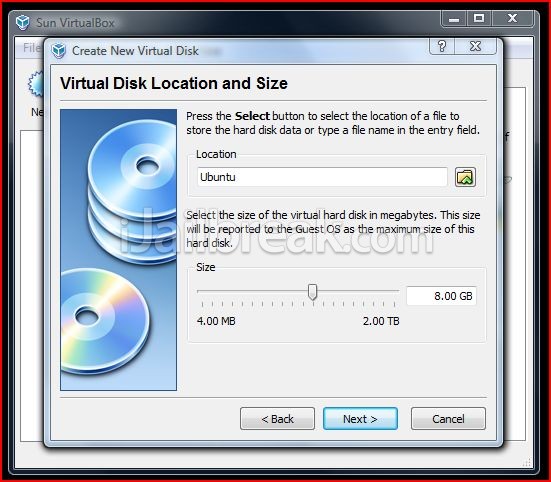
Step 4) - When Ubuntu finishes downloading go back to the VirtualBox interface and click the New Button (The Button that says New with the Blue badge icon; on the top left of the screen). Follow the Screenshots to finish configuring VirtualBox to run Ubuntu…
When you get to the Finish Screen press the Finish Button and continue to the next step below…
Step 5) – With VirtualBox now configured to run Ubuntu you can hit the run button from your VirtualBox interface now. From here its going to ask us to locate our operating system file; click the ISO IMAGE option and then locate your Ubuntu.iso file that you downloaded previously. Once you have your Ubuntu.iso file selected click the ok Button and follow the rest of the easy instructions presented to you by Ubuntu to configure the Ubuntu Operating System.
Switching Back over to the Repository…
Now that we have VirtualBox successfully installed take a few minutes to get used to Ubuntu and its features. Ubuntu works like almost all other operating systems, but like all new things it can take some time getting used to. Once you have familiarized yourself with Ubuntu we are going to begin the creation of your Cydia repository.
The first step to creating your Cydia repository is to actually have a program or a theme that you are going to host in your repository. If you already have a program or a theme to host you can skip this step, however if you do not have one then we are going to need to create one.
If you remember from earlier in this post we learn’t that Cydia works like a Debian APT repository and anything that you install from Cydia comes in the form of packages. These packages have specific file structures depending on whether they are an application or a theme.
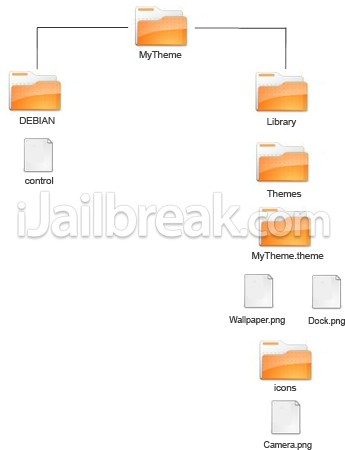
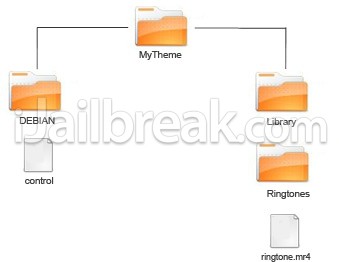
If you want to create a theme for your repository you are going to need the following file structure.
Obviously this theme wont look like anything but you get the point that this is the file structure for a theme. If you want to replace the images inside the MyTheme.theme folder go ahead, I simply used blank files and renamed them to make this file structure.
You can Download this Theme File Here or you can create it yourself…
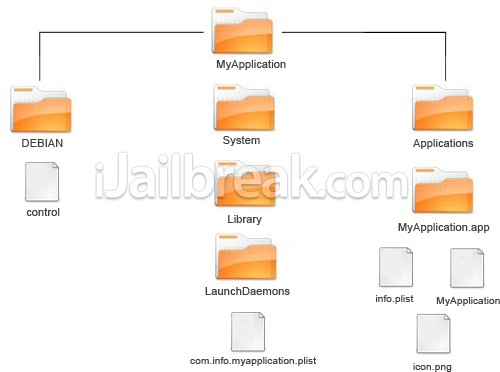
If you want to create an application for your repository you are going to need the following file structure.
Again obviously this application won’t do anything but you get the point that this is the file structure for an application. If you want to replace the files inside the MyProgram.app folder go ahead, I simply used blank files and renamed them to make this file structure.
You can Download this Application File Here or you can create it yourself…
If you want to create a ringtone for your repository you are going to need the following file structure.
Again obviously unless you replace the blank files with actual files, this ringtone will not function; but you get the idea.
You can Download this Ringtone File Here or you can create it yourself…
Step 1) - Now that we have our Application, Theme or ringtone we need to actually put information into our control file. ** Note If you haven’t created a control file yet go into your Application or Theme folder and inside the DEBIAN folder right click and click create new document. A blank file will appear; name it “control” exactly as shown. Then double click the file to start editing it. You are going to need the following information inside your control file…
Step 2) - With your Application or Theme’s control file now finished you are done with the creation of your package that you are going to host in your Cydia repository . The next thing you need to do is begin preparing to create a .deb file out of your Application or Theme. In order to create a .deb file you are going to need a couple tools that will create the .deb files in Ubuntu.
Download the Tools Packages Here.
When the download is successfully completed it should be on your desktop or in the downloads folder.
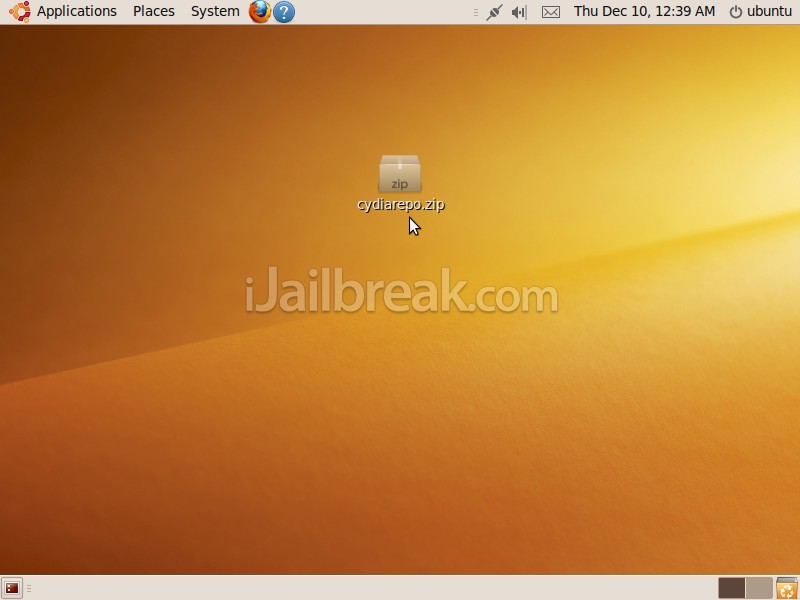
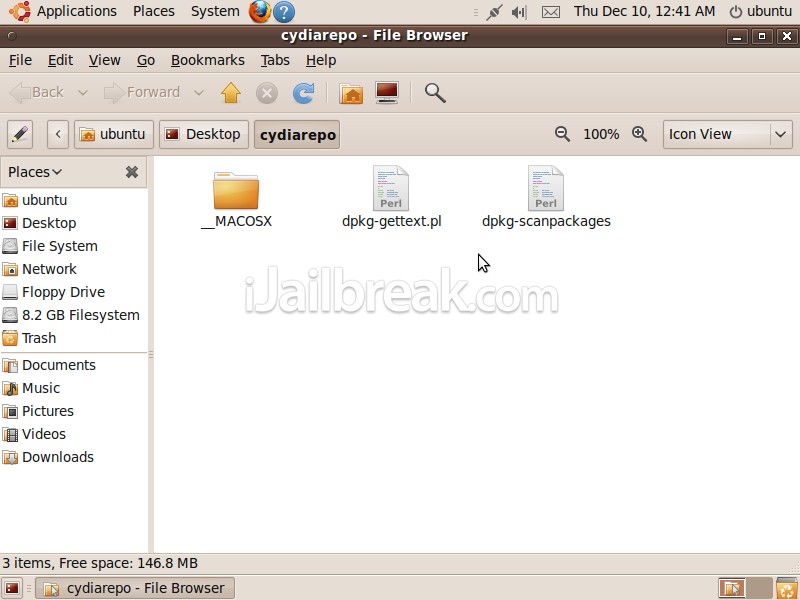
Find the cydiarepo.zip file that you downloaded and extract the archived file to your desktop so you can use them. To do this right click on the cydiarepo.zip and hit the extract button, and once the files are done extracting you should be left with the files depicted below.
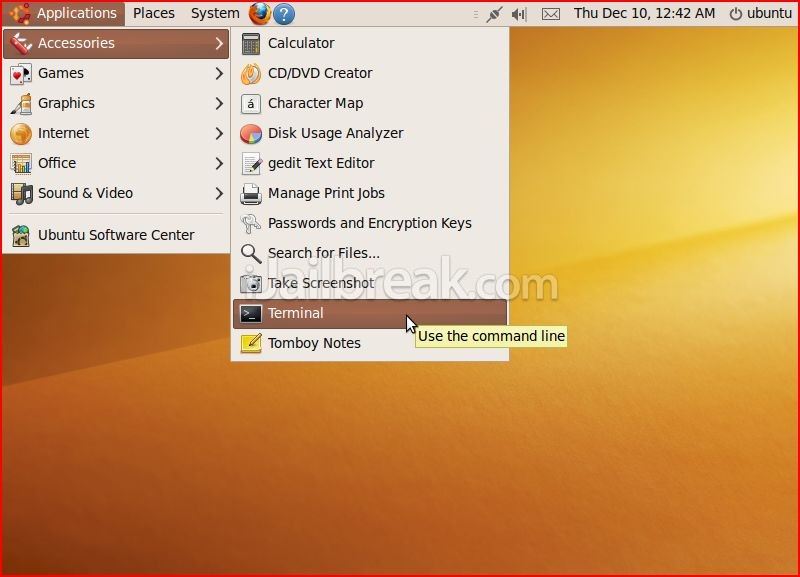
Once the files are extracted we are going to need to transfer them to their respected locations. We are going to do this through an application called terminal; launch terminal by going into the applications toolbar, then into accessories and then click on the terminal icon…
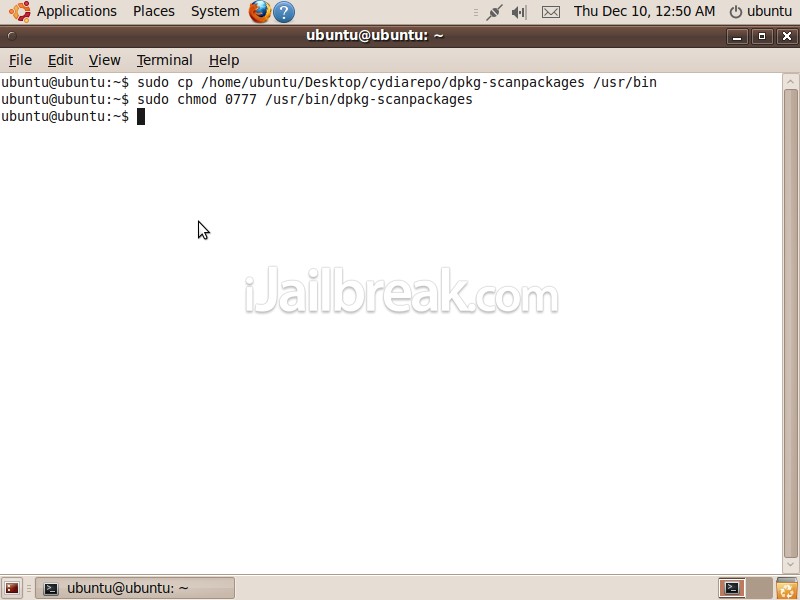
With terminal up and running we are going to need to enter in some commands. We need to move the file dpkg-scanpackages to its proper location within Ubuntu and to do this we are going to use terminal commands. If you are new to terminal this is going to be the tricky part for you! What terminal is is basically the backbone to your computer through terminal you can give your computer commands. All you are going to need to do is enter the commands that are shown to you below into terminal. The commands below are case sensitive so copy everything exactly as shown and replace *username* with your Ubuntu Username.
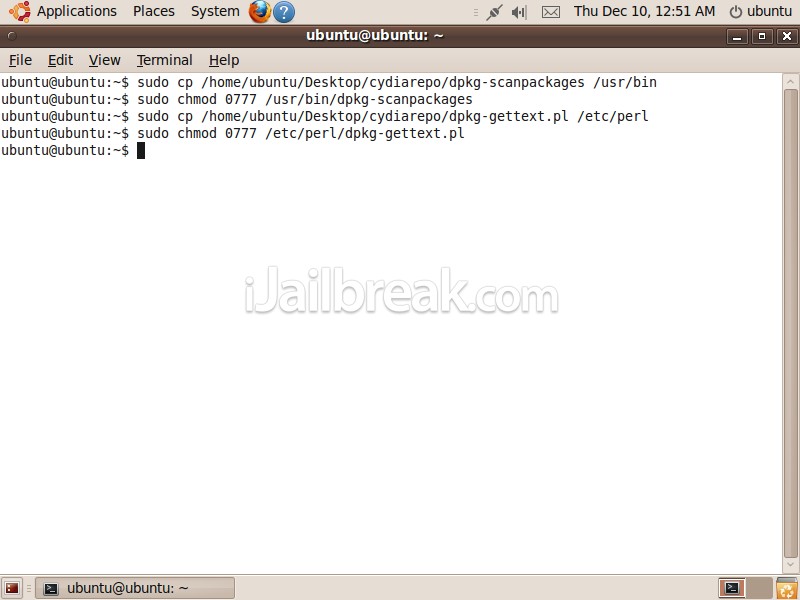
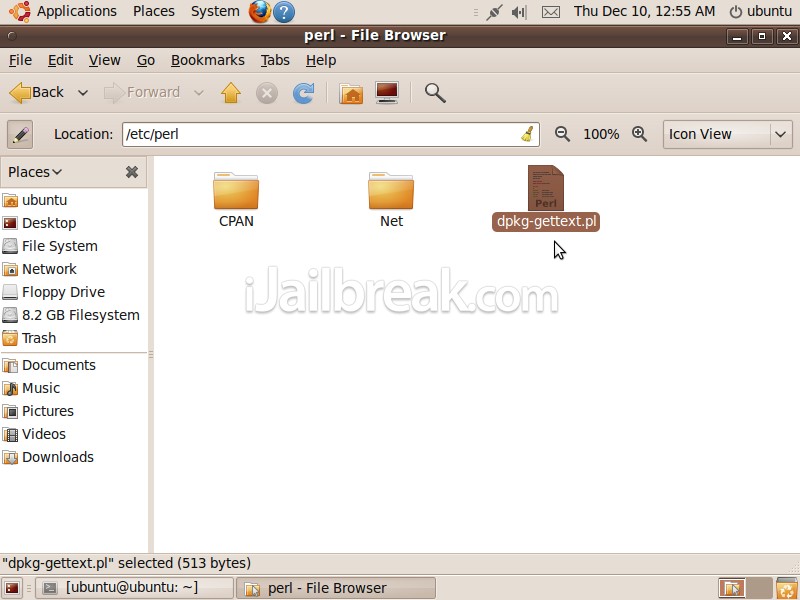
We are going to also do the same thing for the file dpkg-gettext.pl and check if it is in the right place. Type in /etc/perl into the text box beside the pen icon and you should see the file dpkg-gettext.pl. If you do not see the files in their respected locations then go back to terminal and make sure you enter the commands in correctly.
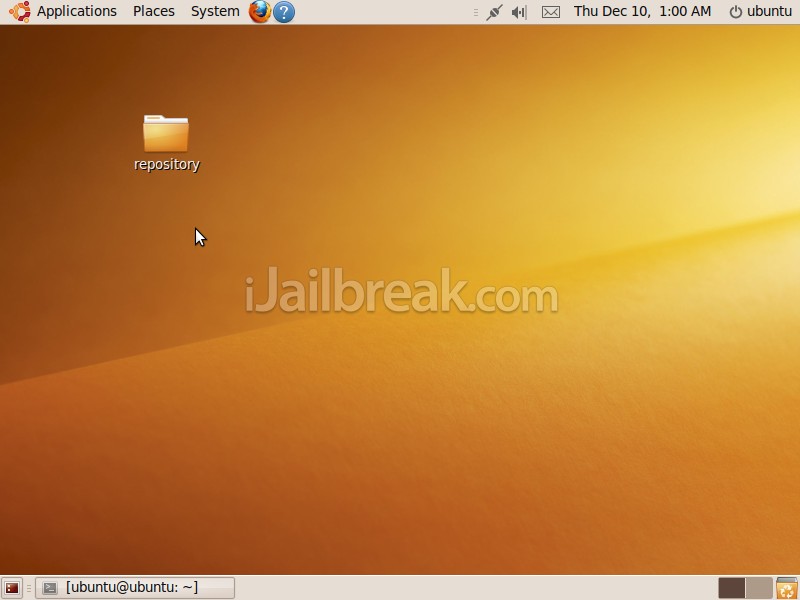
Step 1) - With the two files now in place we are going to begin creating the file structure for our Cydia Repository. Create a Folder on your desktop and name it “repository”.
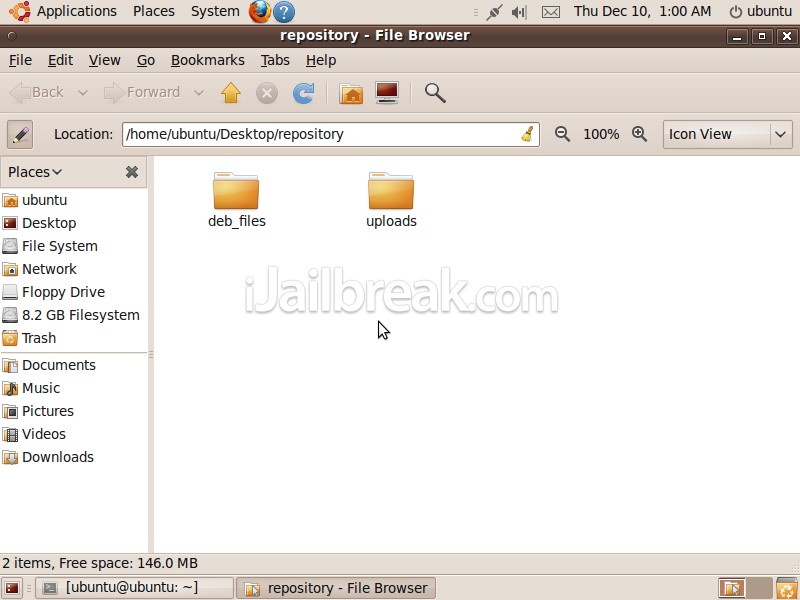
Inside the “repository” folder create two other folders called “uploads” and “deb_files”.
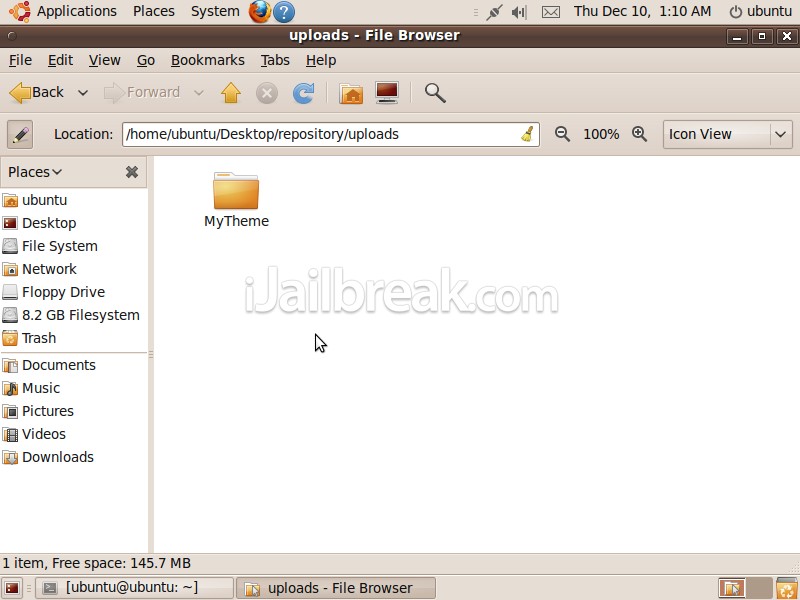
With the folders created we are now going to place your theme or application inside the “uploads” folder.
Step 2) - Now that your Application or Theme is placed inside the “uploads” folder we are now going to go back to terminal and create our .deb file.
Launch terminal if you closed it and enter in the following commands exactly as shown. **Note You must type the package name exactly as it appears on the folder that your Application or Theme is in.
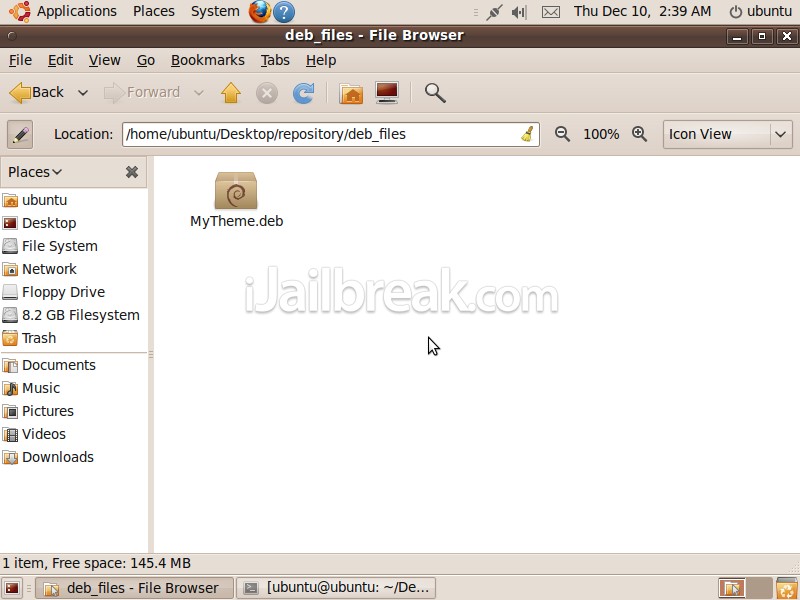
The next thing we need to do is move our .deb file from the “uploads” folder to the “deb_files” folder.
Step 3) - Now that your .deb file is in its proper place we need to create our Packages file. This file will contain all the data for the files that are in your repository so that when people add your Cydia Repository via Cydia it will know what packages are in your repository and how many there are etc. Enter the following commands into terminal…
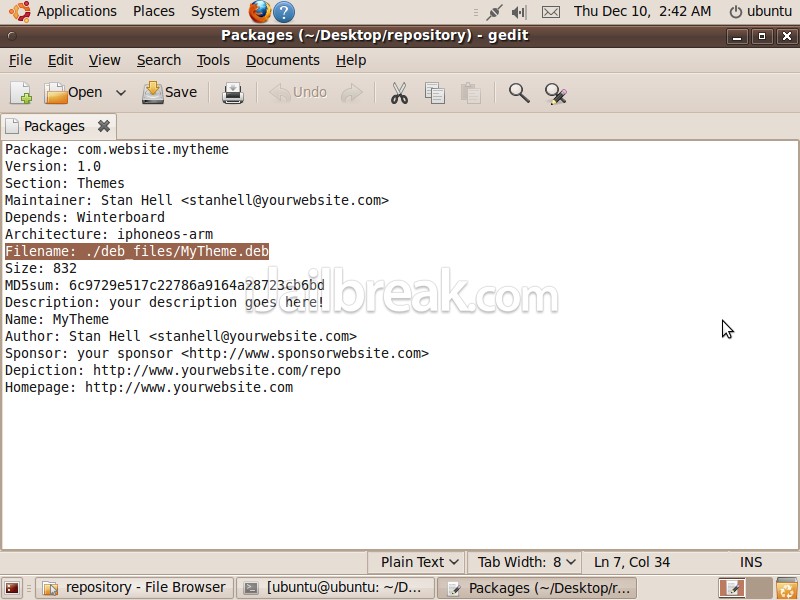
We need to make sure the Packages file correctly linked to the location of your .deb file. To do this simply double click the Packages file and make sure you have the correct file path to your .deb file which should be ./deb/MyProgram.deb as highlighted below. If you do not see the correct file path then simply correct this error now and then save the file.
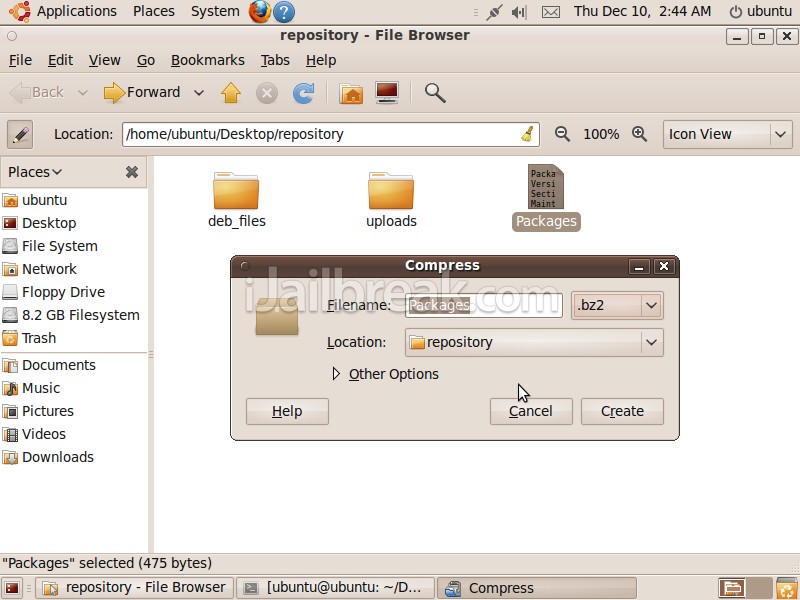
Step 7) - The Next thing we need to do is archive the Packages file that we just created and turn it into a .bz2 file. To do this right click on the Packages file and hit the Compress Button. We want to change the extension to .bz2 and once this option is selected hit the Compress Button now.
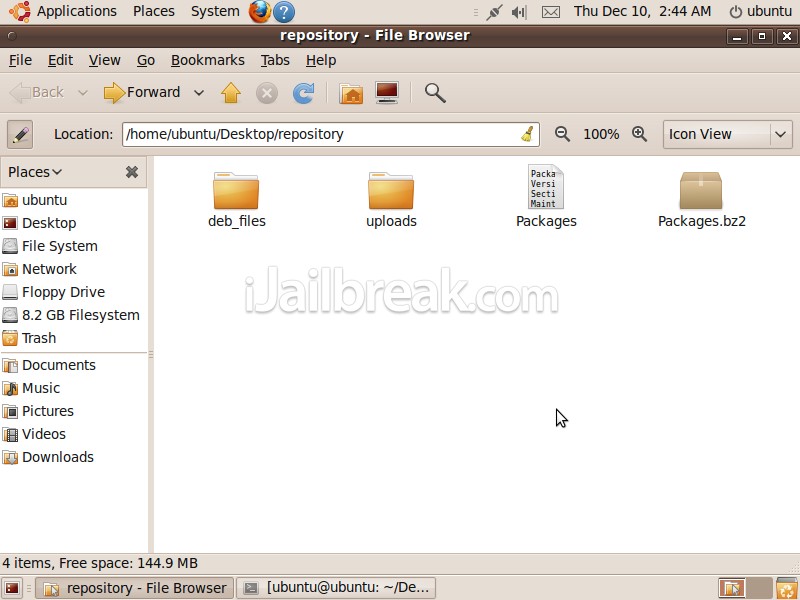
We should now have the following files in our “repository” folder shown below.
Step 4) – The last file that we need to create that is required is the Release file; this file contains the metadata of your repository. Right click and create a new file inside your “repository” folder and name the file Release. Double click the file and enter in the following information:
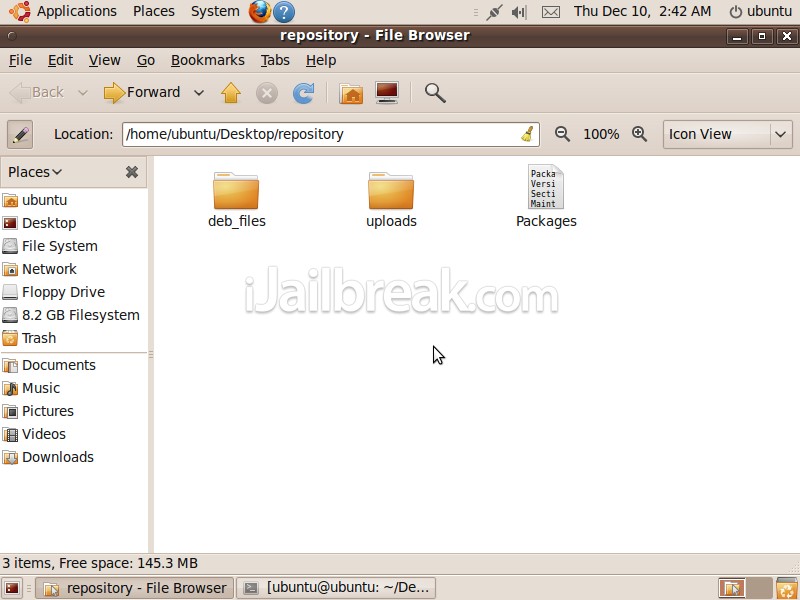
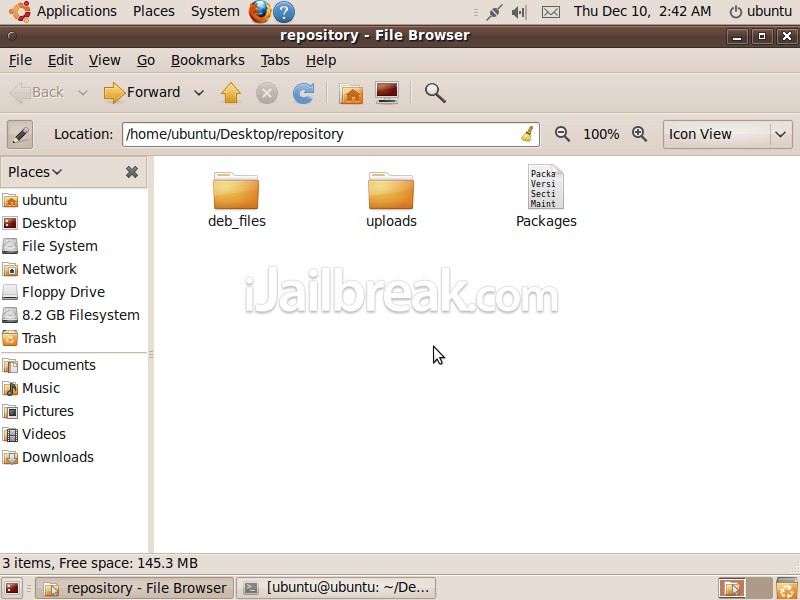
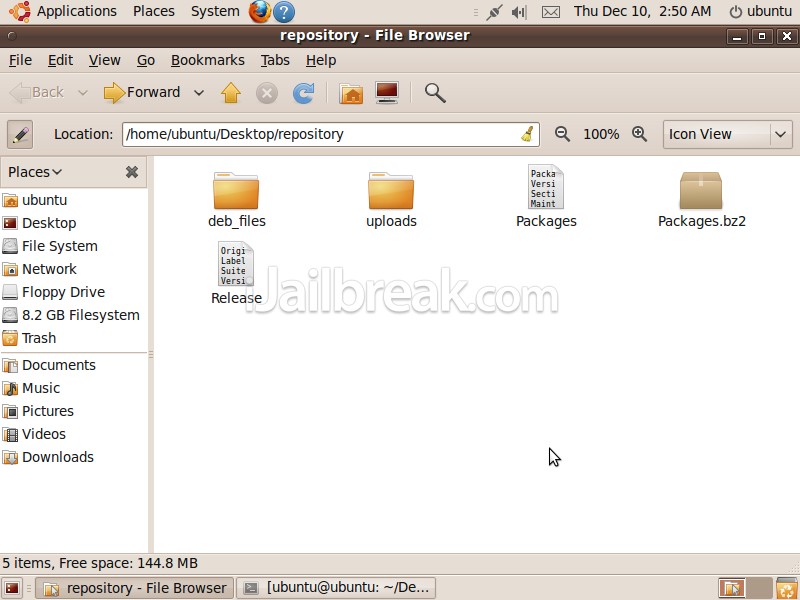
You should now have 3 files “Packages,Packages.bz2 and Release” and 2 folders “uploads and deb_files” in your “repository” folder.
Now that we have all the files needed for our repository we are going to upload the “repository” folder to our host using an ftp program of your choice. Once your “repository” folder is upload to your host then you can add it through Cydia. To do this simply go into the Manage Tab > Sources > Edit > Add and then type in the URL of your Repository and wait for cydia to add your source. Congratulations if you get success and everything works you have now created a Cydia Repository. If you want to add more Applications or Themes to your Repository simply repeat the steps add more packages. If you did not get success post your questions/comments in the comments section below, and I will personally help you out.
Don’t forget to add “iJailbreak’s Repository!” – click here.
P.S. If you are interested in developing custom depiction page, this is a great framework to get you started.
- pre-requirements
- Installing a Virtual Machine
- Creating Files for your Repository – A Theme, An Application or a Ringtone
- Prepping Ubuntu to create a Cydia Repository
- Creating the Cydia Repository
- Creating a unique Depiction Page (Coming Soon)
2) A Computer with Linux/Ubuntu 8.10 plus - If you are running either windows or Mac there are many ways to run Ubuntu without disturbing your current operating system. In this tutorial I will show you how to set up a virtual machine running Ubuntu that will run on both Windows and Mac OSX operating systems. There is also the option of dual booting your computer to run Ubuntu however I will not be going into detail on this subject. **Note fink on Macintosh will work, but because I don’t have a mac to test it on I can not guarantee anything… You can DOWNLOAD UBUNTU HERE.
3) Patience and an hour or two – Creating a Cydia repository (especially if your new to this sort of thing), can be very challenging and time consuming. Don’t give up if you are getting frustrated, if at any point during this tutorial you need help please post any questions/comments in the comments section below.
Further Reading
Jay Freeman aka Saurik; the creator of Cydia, Winterboard, Cycorder and many other well known applications, is the one who made this all possible. He wrote a great introduction to creating a Cydia repository that will take on a more advanced/technical aspect. If you are looking for more information on this subject please visit the link below…http://www.saurik.com/id/7
Step 1) The first thing we need to do before we can create your Cydia repository is to install and setup a virtual machine that will run Ubuntu. A virtual machine runs like an application on your current operating system but emulates the operating system of your choice (in this case Ubuntu) through a virtual hardrive. Go to VirtualBox.com and click on the download that corresponds to your operating system that you are running right now. Wait for VirtualBox to fully download before continuing to the next step…
Step 2) With virtual Box now downloadew, we are going to double click on the Setup.exe to begin the installation process. Follow the Screenshots and Instructions presented to you below…
(If you know how to install VirtualBox Click Here to skip these screenshots)
Step 3) - With VirtualBox now installed we are going to need to download a copy of Ubuntu. Go to www.ubuntu.com and download the latest version of Ubuntu to your computer.
Step 4) - When Ubuntu finishes downloading go back to the VirtualBox interface and click the New Button (The Button that says New with the Blue badge icon; on the top left of the screen). Follow the Screenshots to finish configuring VirtualBox to run Ubuntu…
When you get to the Finish Screen press the Finish Button and continue to the next step below…
Step 5) – With VirtualBox now configured to run Ubuntu you can hit the run button from your VirtualBox interface now. From here its going to ask us to locate our operating system file; click the ISO IMAGE option and then locate your Ubuntu.iso file that you downloaded previously. Once you have your Ubuntu.iso file selected click the ok Button and follow the rest of the easy instructions presented to you by Ubuntu to configure the Ubuntu Operating System.
Switching Back over to the Repository…
Now that we have VirtualBox successfully installed take a few minutes to get used to Ubuntu and its features. Ubuntu works like almost all other operating systems, but like all new things it can take some time getting used to. Once you have familiarized yourself with Ubuntu we are going to begin the creation of your Cydia repository.
The first step to creating your Cydia repository is to actually have a program or a theme that you are going to host in your repository. If you already have a program or a theme to host you can skip this step, however if you do not have one then we are going to need to create one.
If you remember from earlier in this post we learn’t that Cydia works like a Debian APT repository and anything that you install from Cydia comes in the form of packages. These packages have specific file structures depending on whether they are an application or a theme.
If you want to create a theme for your repository you are going to need the following file structure.
Obviously this theme wont look like anything but you get the point that this is the file structure for a theme. If you want to replace the images inside the MyTheme.theme folder go ahead, I simply used blank files and renamed them to make this file structure.
You can Download this Theme File Here or you can create it yourself…
If you want to create an application for your repository you are going to need the following file structure.
Again obviously this application won’t do anything but you get the point that this is the file structure for an application. If you want to replace the files inside the MyProgram.app folder go ahead, I simply used blank files and renamed them to make this file structure.
You can Download this Application File Here or you can create it yourself…
If you want to create a ringtone for your repository you are going to need the following file structure.
Again obviously unless you replace the blank files with actual files, this ringtone will not function; but you get the idea.
You can Download this Ringtone File Here or you can create it yourself…
Step 1) - Now that we have our Application, Theme or ringtone we need to actually put information into our control file. ** Note If you haven’t created a control file yet go into your Application or Theme folder and inside the DEBIAN folder right click and click create new document. A blank file will appear; name it “control” exactly as shown. Then double click the file to start editing it. You are going to need the following information inside your control file…
Package: this is the identifier of the package and this should be all lower case. It is similar to the bundleIdentifier in Apple’s Info.plist file.Once you are done editing your control file make sure it looks something like the screenshot below. **Note Make SURE TO HIT “ENTER” AT THE END TO HAVE A BLANK LINE ON THE BOTTOM OF YOUR CONTROL FILE…
Name: The Name of your Application or Theme.
Version: Your Application or Theme’s version number.
Architecture: This line will almost always be “iphoneos-arm” if you are writing for firmware generations 2.x/3x.
Depends: Only use this field if your Application or Theme depends on another program. An example would be a theme; it depends on Winterboard in order to function.
Description: a description of your program. (Ignore this field if you used depiction.)
Depiction: This loads a URL into an iframe instead of using the description line. You should use this to display custom links and/or screenshots.
Maintainer: package builder; the person to contact for problems. ( format “Name <email address>”)
Author: who wrote the software. ( same format as Maintainer)
Sponsor: financial provider for your package. (format “Name <website>)
Section: The category in Cydia in which your application or theme belongs to.
Step 2) - With your Application or Theme’s control file now finished you are done with the creation of your package that you are going to host in your Cydia repository . The next thing you need to do is begin preparing to create a .deb file out of your Application or Theme. In order to create a .deb file you are going to need a couple tools that will create the .deb files in Ubuntu.
Download the Tools Packages Here.
When the download is successfully completed it should be on your desktop or in the downloads folder.
Find the cydiarepo.zip file that you downloaded and extract the archived file to your desktop so you can use them. To do this right click on the cydiarepo.zip and hit the extract button, and once the files are done extracting you should be left with the files depicted below.
Once the files are extracted we are going to need to transfer them to their respected locations. We are going to do this through an application called terminal; launch terminal by going into the applications toolbar, then into accessories and then click on the terminal icon…
With terminal up and running we are going to need to enter in some commands. We need to move the file dpkg-scanpackages to its proper location within Ubuntu and to do this we are going to use terminal commands. If you are new to terminal this is going to be the tricky part for you! What terminal is is basically the backbone to your computer through terminal you can give your computer commands. All you are going to need to do is enter the commands that are shown to you below into terminal. The commands below are case sensitive so copy everything exactly as shown and replace *username* with your Ubuntu Username.
sudo cp /home/username/Desktop/cydiarepo/dpkg-scanpackages /usr/binNext we need to do the same thing for the dpkg-gettext.pl file. Enter the following commands into terminal…
(Hit Enter)
sudo chmod 0777 /usr/bin/dpkg-scanpackages
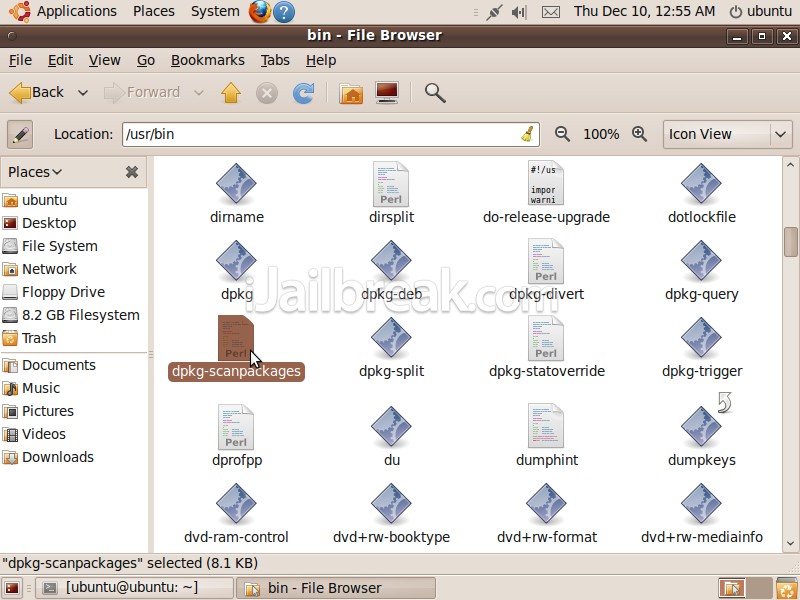
sudo cp /home/username/Desktop/cydiarepo/dpkg-gettext.pl /etc/perlStep 3) - With the commands now entered we are going to check to make sure the two files ended up where they were supposed to go. Open up any file on your desktop and in the top left hand corner you should see a little pen icon. Click the pen icon and type in /usr/bin in the text box beside it (again these are case sensitive so enter it exactly as shown). You should see the file dpkg-scanpackages if you scroll down a little ways; as shown below.
(Hit enter)
sudo chmod 0777 /etc/perl/dpkg-gettext.pl
We are going to also do the same thing for the file dpkg-gettext.pl and check if it is in the right place. Type in /etc/perl into the text box beside the pen icon and you should see the file dpkg-gettext.pl. If you do not see the files in their respected locations then go back to terminal and make sure you enter the commands in correctly.
Step 1) - With the two files now in place we are going to begin creating the file structure for our Cydia Repository. Create a Folder on your desktop and name it “repository”.
Inside the “repository” folder create two other folders called “uploads” and “deb_files”.
With the folders created we are now going to place your theme or application inside the “uploads” folder.
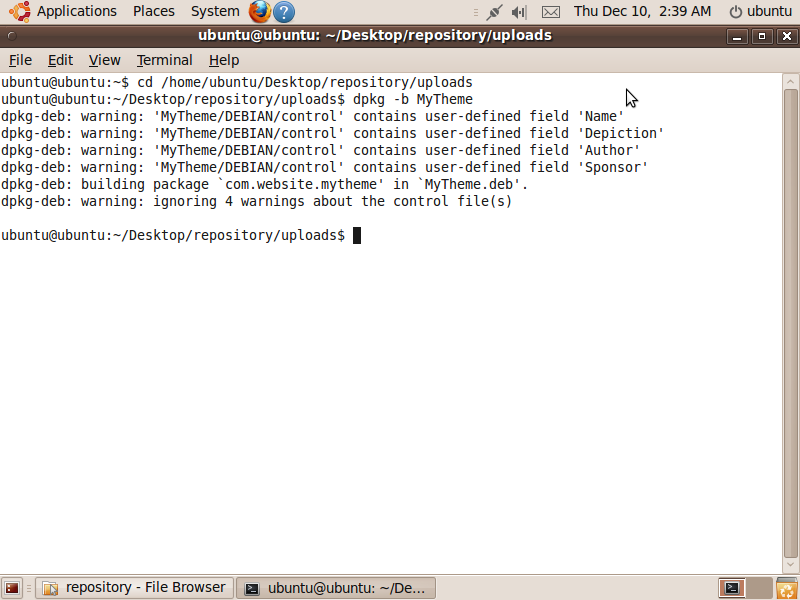
Step 2) - Now that your Application or Theme is placed inside the “uploads” folder we are now going to go back to terminal and create our .deb file.
Launch terminal if you closed it and enter in the following commands exactly as shown. **Note You must type the package name exactly as it appears on the folder that your Application or Theme is in.
cd /home/username/Desktop/repository/uploadsIf everything worked correctly we should now see a .deb version of your Application or Theme inside the “uploads” folder. **Note Ignore any warning messages as they are just custom fields that Cydia uses that aren’t being recognized by Ubuntu.
(hit enter)
dpkg -b MyTheme
The next thing we need to do is move our .deb file from the “uploads” folder to the “deb_files” folder.
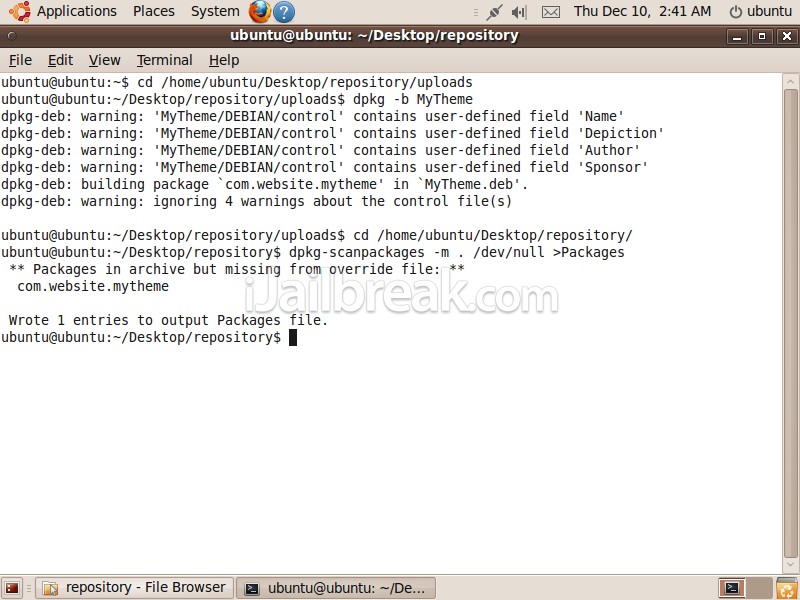
Step 3) - Now that your .deb file is in its proper place we need to create our Packages file. This file will contain all the data for the files that are in your repository so that when people add your Cydia Repository via Cydia it will know what packages are in your repository and how many there are etc. Enter the following commands into terminal…
cd /home/username/Desktop/repository/You should now see the Packages file in your “repository” folder.
(Hit Enter)
dpkg-scanpackages -m . /dev/null >Packages
We need to make sure the Packages file correctly linked to the location of your .deb file. To do this simply double click the Packages file and make sure you have the correct file path to your .deb file which should be ./deb/MyProgram.deb as highlighted below. If you do not see the correct file path then simply correct this error now and then save the file.
Step 7) - The Next thing we need to do is archive the Packages file that we just created and turn it into a .bz2 file. To do this right click on the Packages file and hit the Compress Button. We want to change the extension to .bz2 and once this option is selected hit the Compress Button now.
We should now have the following files in our “repository” folder shown below.
Step 4) – The last file that we need to create that is required is the Release file; this file contains the metadata of your repository. Right click and create a new file inside your “repository” folder and name the file Release. Double click the file and enter in the following information:
Origin: a slightly longer version of your repository name.With the information now entered it should look something like the screenshot below…
Label: a shorter version of repository name.
Suite: this line should always be left as “stable”.
Version: your repositories version number.
Codename: you can put whatever you want here.
Architectures: this should always be left as “iphoneos-arm”.
Components: this should always be left as “main”.
Description: a short description of the repository goes here.
You should now have 3 files “Packages,Packages.bz2 and Release” and 2 folders “uploads and deb_files” in your “repository” folder.
Now that we have all the files needed for our repository we are going to upload the “repository” folder to our host using an ftp program of your choice. Once your “repository” folder is upload to your host then you can add it through Cydia. To do this simply go into the Manage Tab > Sources > Edit > Add and then type in the URL of your Repository and wait for cydia to add your source. Congratulations if you get success and everything works you have now created a Cydia Repository. If you want to add more Applications or Themes to your Repository simply repeat the steps add more packages. If you did not get success post your questions/comments in the comments section below, and I will personally help you out.
Don’t forget to add “iJailbreak’s Repository!” – click here.
P.S. If you are interested in developing custom depiction page, this is a great framework to get you started.


No comments:
Post a Comment